Are you looking for basketball drills and games for kids and high school teams?
Well, you’ve come to the right place!
I frequently receive emails from coaches who are sick tired of running the same drills over and over again at practice.
It’s important for all coaches to use proven basketball drills that will improve their players.
Below I've listed 27 drills and games, and described them in full detail including how the drills works, the purpose, how to set it up, instructions, variations, and coaching points.
You'll find 50+ more basketball drills in the links under each section!
Here's a handy little table of contents to jump straight to the type of drills you want.
Basketball Shooting Drills
1. Perfects
Overview:
This is a great basketball drill for players to practice shooting with perfect form and also a for coaches to teach and correct shooting form.
Setup:
Players form three lines a couple of feet out from the basket. Use both ends of the court if possible so that kids get to take more shots. Every players has a basketball.
How it Works:
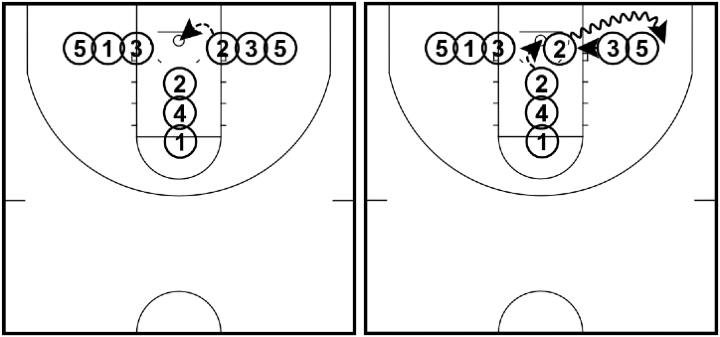
1. Players then take it in turns shooting with the aim to swish each shot through the net. The swish is important because we’re trying to teach the kids how to shoot with enough arc on the shot.
2. After a player has taken a shot, they can either return to the end of the same line or rotate lines either clockwise or anticlockwise.
Coaching Points:
- Players must hold their shooting form until the shot has been made or missed.
- Coaches must view each players’ shot at different angles. Different angles will show different technique points.
- You can extend the distance of the shot, but make sure it’s not too far. The purpose of this drill is shooting with perfect form around the basket.
2. 21 Cones
Overview:
’21 cones’ is a variation of the drill ’23 cones’ which is a drill I recommend for high school level and higher.
All players are in two teams and each time a player hits a shot, they’re awarded a cone for their team.
Setup:
Place 21 cones on the baseline of one end of the court and then split your players up into two teams. Each team has only one basketball.
How it Works:
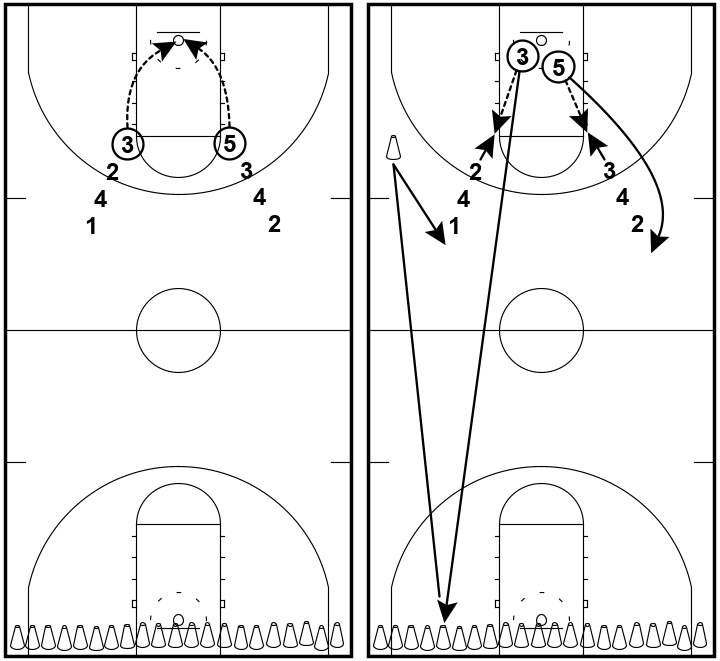
The two teams of players shoot from the designated spot. When a shot is made, the shooter is rewarded by being allowed to sprint to the other end of the court and retrieve a cone for their team.
The team that finishes with the most cones is the winner.
Coaching Points:
- Everyone must be shooting. Not just the best shooters on each team.
- If you don’t have cones, you could use tennis balls or anything else similar.
- You can decrease or increase the amount of cones.
3. Pivot Shooting
Overview:
This is a great drill for incorporating footwork into a shooting drill that players will enjoy.
Players perform a jump stop on receiving the pass from the coach, pivot around to square up to the basket, and then make a variety of scoring moves.
Setup:
Players all start on the baseline in two lines. There are two coaches/parents at the top of the key. One in front of each line.
Every player has a basketball.
How it Works:
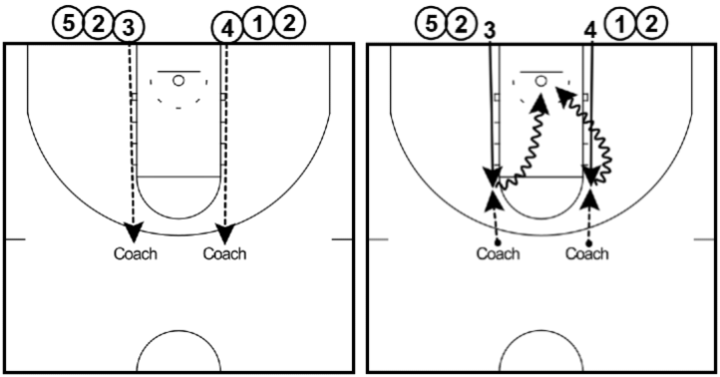
Players will begin the drill by making a chest pass out to the coach in front of them. Immediately after making the chest pass, the player will explode to the free-throw line where the coach will pass the ball back to them.
After catching the basketball in a jump stop, the player must must pivot around using good technique and square up to the basket before shooting or attacking the ring.
The coach decides which scoring move they want the players to make.
Coaching Points:
- Make sure every player is jump stopping correctly. You might need to run through this with the players before running the drill.
- Players should not raise up out of their low stance when pivoting.
- Change up whether your team attacks the rim or takes a jump stop. Keep it interesting.
4. Chase Down Layups
Overview:
Chase down layups is used to teach players to finish layups at full speed and with pressure. Since youth basketball is normally decided by which team makes more layups, this is a basketball drill you must use often.
Setup:
The drill begins with two lines of players down each end of the floor. One offensive line and one defensive line.
One basketball starts at the front of the offensive line at each end of the court.
How it Works:
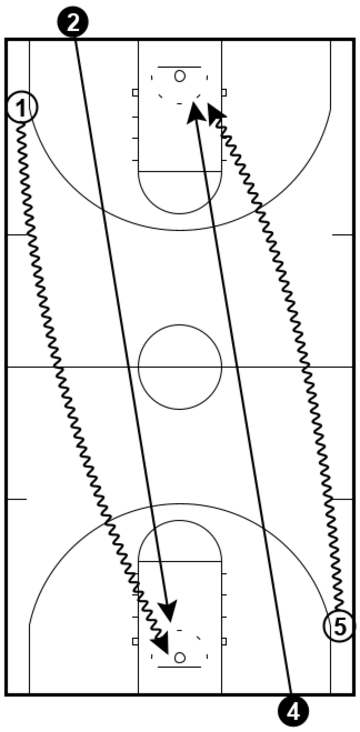
The coach starts the drill by bringing the offensive player out from the baseline and gives them an advantage over the defender who always starts on the baseline. It’s up to the coach’s discretion how far in front the offensive player is.
We want the offensive player far enough in front that they have to sprint while dribbling down the floor and then when they finish at the rim there’s close defensive pressure behind them.
When they’re both set up, the coach calls out ‘GO’ and both players sprint to the other end of the floor. The offensive player must try and finish at the rim and the defender must pressure the shot without fouling.
The pair then passes the basketball to the next player in line at their current end of the floor.
Coaching Points:
- No fouling. You don’t need a major injury while running this drill.
- Switch sides of the floor so that players are dribbling and finishing with their left hand.
- Make sure players are attacking the ring at the correct angle.
5. Pressure
Overview:
Pressure is a simple and fun end-of-practice game that works on shooting free throws while under pressure.
Setup:
All players form one line at the free throw line.
The drill requires only one basketball.
How it Works:
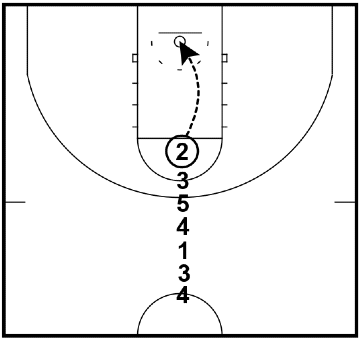
Players take it in turns shooting free throws.
When a player makes a free throw, the person behind them is put under pressure. This means that if they miss, they’re out of the game.
Once someone makes a shot, the pressure continues until someone misses. Once they do, there’s no pressure until another shot is made.
This continues until there’s a winner.
Coaching Points:
- Players are not allowed to put each other off. It will always end up in one of the kids being upset.
- Players should be going through their full free throw routine on each shot.
- Make sure you join in!
More Shooting Links:
Basketball Dribbling Drills
6. Dribbling Lines
Overview:
This is a simple drill to teach the basics of dribbling to new players.
It’s a good way to introduce new moves without overwhelming them and will also help to improve the technique of the movements players already know.
Setup:
Every player has a basketball and lines up on the baseline.
If you have more than 8 players, create two lines on the baseline instead of one.
How it Works:
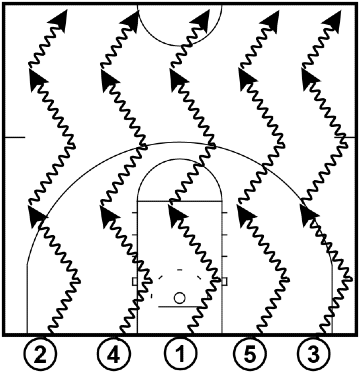
The coach will instruct the players to use different dribbling movements to dribble up to either the half-court line or full court.
Tell them the dribble movement you want to be performed first, and then say ‘go’.
Here are a few that I like to use:
• Right hand up, left hand back
• Crossovers
• Behind-the-back
• Through-the-legs
• Dribble low
• Dribbling backwards
Coaching Points:
- Players must keep their heads up at all times.
- Once they develop good technique, focus on the players pushing off with their outside foot when making a move.
- Write down the dribbling moves so that you don’t forget them. I always do!
7. Dribble Knockout
Overview:
This drill works on ball-handling and protecting the dribble.
All players dribble around in a small area and the goal is to knock other players’ basketball out of the area while keeping your own basketball alive.
Setup:
The first thing the coach must do is determine the area the players will be dribbling in. This will depend on the amount of players you have but will usually be the three-point line or the 1/3 court line.
All players must have a basketball.
How it Works:
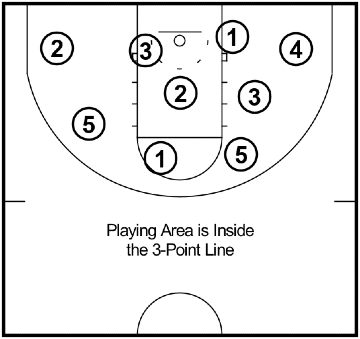
On the coach’s call, all players begin dribbling and attempt to knock each other’s basketball out of the playing area.
As more and more players get out, the coach must pause the game and make the playing area smaller. This continues until you have a winner.
Coaching Points:
- If a player fouls someone else, travels, or double dribbles, they’re out. It’s the coach’s job to keep an eye out for these things.
- Constantly remind players to keep their head up.
- Have a designated area for players that get out or you’ll end up with kids everywhere!
8. Collision Dribbling
Overview:
Similar to dribble knockout except players aren’t allowed to hit the basketball of the other players away.
Instead, the aim of the drills is to navigate through and dodge all the other players using dribbling moves and by being creative with the dribble.
Setup:
All players have a basketball and are in a small space determined by the coach.
How it Works:
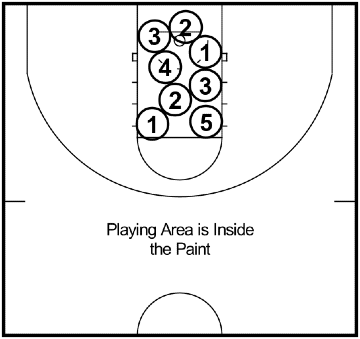
On the coach’s call, all players will start dribbling around each other in the small space aiming to keep their dribble under control.
This basketball drill will improve ball-handling because players must react to other players and can’t predetermine their actions. It also forces all players to keep their heads up or they’ll run into someone!
Coaching Points:
- Don’t allow players to all dribble in the same direction or it will be too easy.
- Keep reminding the players to keep their heads up!
- Encourage players to use both hands. Not just their strong hand.
9. Scarecrow Tiggy
Overview:
Scarecrow Tiggy is a fun drill that involves everyone dribbling around trying to avoid two taggers.
Players love this drill and it’s great for developing ball-handling skills.
Setup:
Every player starts with a basketball and begins in the half court except two players who will be the ‘taggers’.
The taggers don’t have a basketball and preferably are wearing different colored singlets so that other players can identify them.
How it Works:
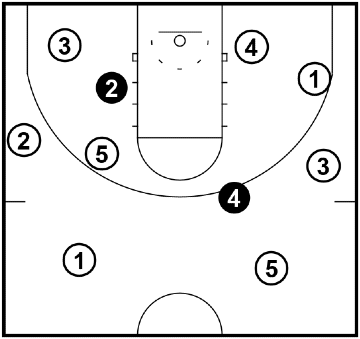
The drill begins when the coach call’s out ‘GO’.
The taggers then do their best to tag each player dribbling a basketball.
When a dribbler is tagged, they must stand in the place they were tagged with their legs wide and hold the ball on top of their head. They can be freed by other dribblers by rolling the basketball through their legs.
This game never has a winner unless the taggers happen to get everyone out at one time (this doesn’t happen often).
Every couple of minutes switch the taggers.
Coaching Points:
- Players are not allowed to throw the ball between a teammates legs, the ball must be rolled.
- Dribblers are not allowed to travel, double dribble, or any other violation. If they do they’re out.
- Change up the amount of taggers and the size of the playing space depending on how many players you have.
10. Dribble Tag
Overview:
Similar to scarecrow tiggy, except that all players start with a basketball (even the taggers) and when you’re caught, you’re out and must sit down on the side of the court.
Setup:
The first thing the coach must do is decide on the playing. This will depend on the amount of players you have.
After that, select two players to be taggers and get everyone else to spread out around the court.
How it Works:
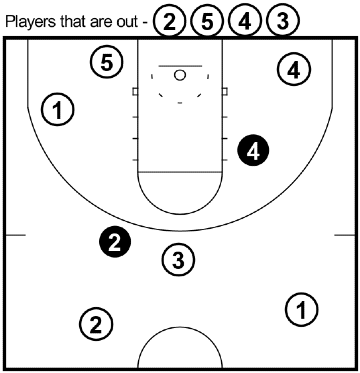
When the drill starts, the taggers attempt to tag as many dribblers as possible.
When a dribbler is tagged, they are now out and must wait on the sideline for the rest of the players to be caught.
This continues until there is one dribbler left and they are the winner.
Coaching Points:
- If the taggers are struggling to tag anyone, consider allowing them to run around without having to dribble a basketball.
- Vary the size of the court and amount of taggers depending on the amount of players you have.
- If a dribbler commits a dribbling violation, they are automatically out.
11. Sharks and Minnows
Overview:
Sharks and Minnows is one of my favorite games for youth practices.
The aim of the game is for the minnows (dribblers) dribble from baseline to baseline without getting tagged by the sharks (taggers).
Setup:
The drill starts with you selecting one or two ‘sharks’ who will be the taggers.
Everyone else will start on the baseline and have a basketball. These are the ‘minnows’.
How it Works:
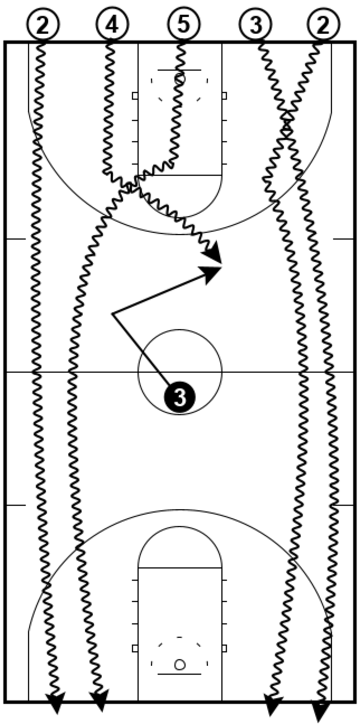
On the coach’s call, the minnows must attempt to dribble to the other baseline without getting tagged by a shark.
If a shark does tag them, they must stand in the spot they were tagged, place the basketball between their feet, and now are scarecrows. If a minnow comes within reach of them, they can tag them to get them out.
The last player alive that hasn’t been tagged is the winner.
Coaching Points:
- As always, if there’s a dribbling violation by a minnow they are immediately out.
- Scarecrows must hold the ball between their feet at all times and stay on balance. This stops them moving too far and cheating.
- Implement a time limit if players are taking too long to get from one side to the other.
More Dribbling Links:
Basketball Passing Drills
12. Partner Passing
Overview:
Partner passing teaches the absolute basics of passing and allows your players to practice different types of passes and the correct technique.
A great drill for kids beginning to learn the game of basketball.
Setup:
Players get into pairs and should have one basketball between them.
Once the players are in pairs, they must stand on a line parallel from their partner.
How it Works:
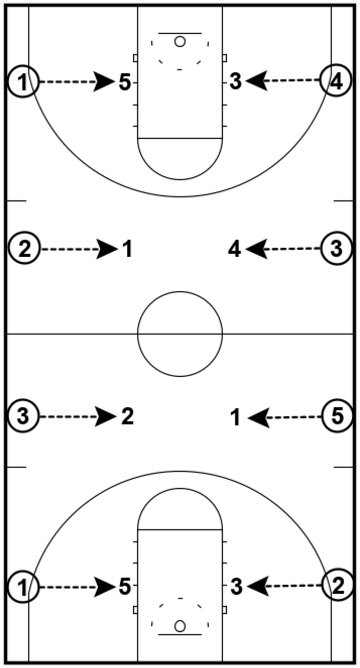
The coach will explain which type of pass they want performed and then the players will pass back and fourth to each other.
Every minute or so the coach can change the type of pass the players are performing or increase the distance they are apart if it’s too easy.
Coaching Points:
- Make sure you mix up which type of pass you want them to perform (bounce pass, chest pass, one-handed push-pass, ect).
- Don’t allow players to be silly and throw the basketball too hard at their partner. It will end up with blood noses.
- Make sure all coaches are teaching the same passing technique so the kids don’t get confused.
13. Stationary Keepings Off
Overview:
This main goal of this drill is to teach the basics of spacing between players and also to teach decision making on the catch.
When players are young we all know they constantly sprint towards the basketball. By keeping them stationary in this drill, we show them that it’s easier to keep the ball away from the defense if we’re spread apart.
Setup:
Select one or two players to be the defenders and get the rest of your players to spread out in a small area like the three-point line.
The team on offense will only need one basketball.
How it Works:
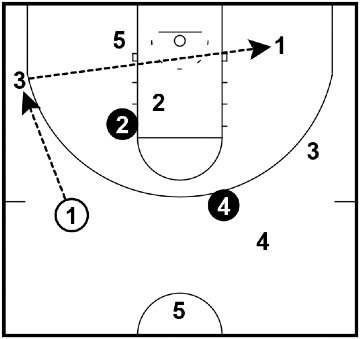
When the drill begins, the defenders will run around trying to steal the basketball from the offensive team. The defenders goal is to get a deflection or a steal.
The offensive players must stay in one space and pass the ball around to each other keeping the basketball away from the defenders.
After a minute or two, swap the defenders over.
Coaching Points:
- Allow the defenders to sprint around wildly. They’ll have fun.
- Encourage the offensive team to make quick decisions when they receive the basketball.
- Make sure everyone is getting a turn to pass on offense. If they’re not, join in the game and pass them the basketball.
14. Count Em’ Up
Overview:
This basketball drill is a more advanced version of the keepings off game.
It works on getting open, denying the offensive player, and making smart passes to limit turnovers.
Setup:
The first thing you need to do is split the kids up into two even team. Preferably the teams are different colors so that they can differentiate between each other during the drill.
The drill involves only one basketball.
How it Works:
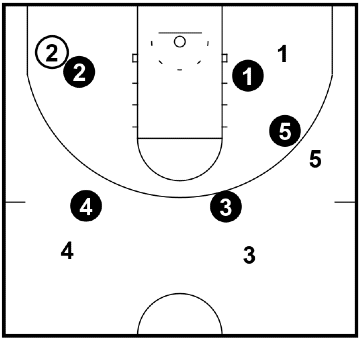
The first thing that happens is that all players must match-up and stick to their individual opponent.
The goal of the drill is to move around make a certain amount of passes set by the coach without the opposition deflecting the basketball or getting a steal. No dribbling or shooting allowed.
The amount of passes that must be made should be between 5 and 20 depending on age and experience.
Players are allowed to move around wherever they want within the playing area.
If the defenders get a steal or deflect the basketball out of bounds, it becomes their ball and the offense and defense switch roles.
For each time that a team successfully makes the certain number of passes, they get 1 point.
Coaching Points:
- Encourage players to set screens for each other and use body fakes to get open.
- Encourage the best players to play against each other and challenge each other.
- Spacing is of the utmost importance. Don’t allow players to sprint at the basketball.
15. Continuous 3 on 2
Overview:
This is one of the best basketball drills I know for improving passing and decision making.
As the name suggests, it’s continuous 3 on 2. Having an extra player on offense means that there’s always someone open as long as the offensive team keeps spaced apart.
Setup:
The drill starts with 3 offensive players in the middle of the court, 2 defenders in each half court, and the rest of the players standing out of bounds at the half court line.
Only one basketball is needed for this drill.
How it Works:
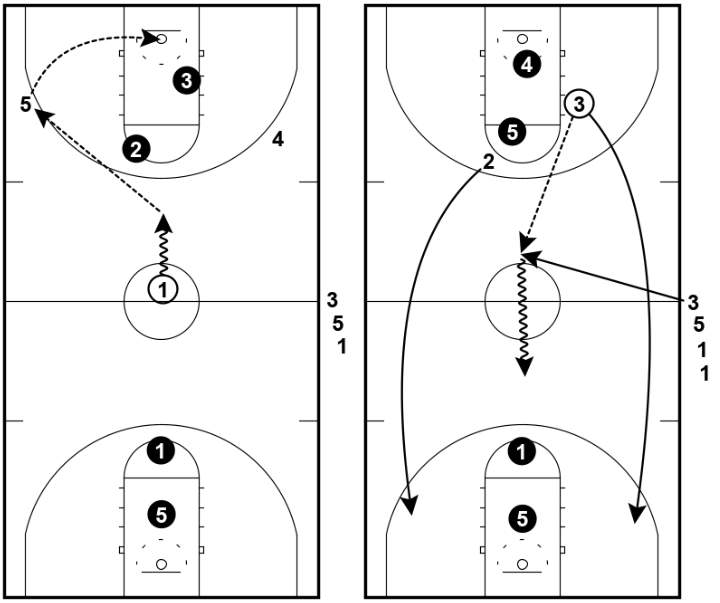
The three offensive players attack two defenders at one end of the court and will either score or the defensive players will get the basketball.
Once the two defensive players get the basketball (either by steal, rebound, or because the offensive team scored), they outlet to the next player in line at half way who sprints in to help advance the ball.
The two defenders now become offensive team and they get an extra player from the sideline to give them 3 players. They now attack towards the other end of the court 3 on 2.
As for the 3 previous offensive players, 2 of them become the next defenders and 1 of them joins the end of the out of bounds line.
This process repeats for a set amount of time.
Coaching Points:
- Make sure the offensive players are staying spaced on the floor so that they can get open looks.
- There’s no reason the offensive team shouldn’t be taking an open shot.
- If you want to make the drill more advanced, don’t allow the players to dribble the basketball.
More Passing Links
Basketball Footwork Drills
16. Four Corners
Overview:
This is a great drill for working on jump stops, pivoting, and passing.
It will allow the coach to teach the different kinds of pivots and is a drill the players enjoy doing.
Setup:
The coach must first create a large square in the half-court by placing four cones an even distance apart. There must also be another cone or D-man in the exact middle of the square. You can see where I recommend placing these cones in the diagram.
Split your team up into four groups and send each group to a cone. The cones will be the starting position for each line.
The person at the front of each line has a basketball.
How it Works:
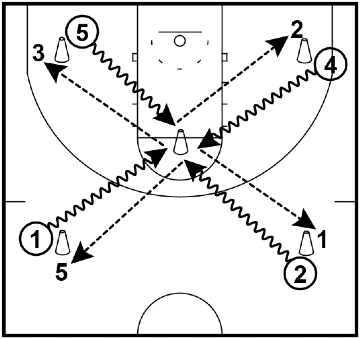
The first thing the coach must do is tell the players which way they’ll be passing (either right or left) and which kind of pivot they should use.
When the coach calls out ‘go’, each player with a basketball dribbles in towards the middle cone, performs a jump stop a couple of feet away, pivots, and then passes to the next line before joining the end of it.
The next player in the that catches the basketball does not start until the coach has called out ‘go’ again.
Coaching Points:
- Each player must be pivoting the same direction so that two balls don’t end up being passed to one line. Do make sure to reverse the direction half way through the drill.
- Use front and reverse pivots and make sure players aren’t traveling.
- Explain to the players it’s better to jump stop with a small hop. The higher they jump, the more off-balance they’ll be when they land.
17. Red Light, Green Light
Overview:
This is a simple but effective drill that will improve and allow you to teach jump stops and pivoting.
I have used this basketball drill with every single youth team I’ve coached.
Setup:
The drill starts with every player line up along the baseline holding a basketball.
If you have more than 10 players, I recommend creating two lines.
How it Works:
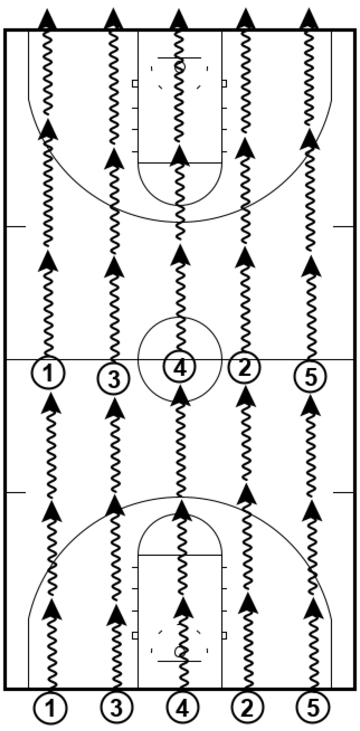
Everyone starts on the baseline in triple threat position.
The coach will then lead the players up the court by calling out ‘go’ and ‘stop’. On go, the players begin dribbling at a comfortable pace towards the opposite end of the court. When the coach says stop, the players must immediately perform a jump stop.
This continues until the players reach the other end of the court.
Once your players are comfortable with the jump stops and are performing them correctly, you can make the drill more advanced by adding pivots.
You can either say ‘pivot’ and allow them to pivot either way. Or you can be specific and say ‘right foot pivot’ or ‘left foot pivot’.
Coaching Points:
- Players must not jump too high on the jump stops.
- Make sure players in good stance when they land after the jump stop. Knees bent and head up.
- If adding pivots, make sure players don’t raise out of their stance when pivoting.
18. Explode, Pivot, Pass
Overview:
This drill focuses on basic footwork fundamentals. It’s a really quick and simple drill to run. Your team can get a lot of benefit out of it even if it’s only run for 5 minutes.
Setup:
Players get into groups of 2 or more. I prefer 3 players in each group if possible.
Each group has one basketball and should start in a straight line behind either the sideline or the baseline.
How it Works:
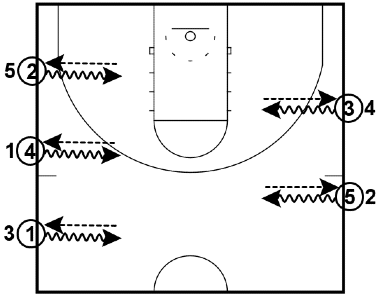
The player starting with the basketball must begin the drill behind the line in triple threat stance.
Their first action is to take two explosive dribbles out from the line and then perform a controlled jump stop.
After the jump stop, the player pivots 180 degrees until they’re facing their group and makes a strong chest pass to the next person in line. They then jog to the end of the line.
The three main things coaches are looking at are:
1. No traveling when exploding off the dribble.
2. A controlled jump stop.
3. A controlled pivot.
This process continues for a set amount of time.
Coaching Points:
- The player receiving the basketball should be starting in a low stance and showing target hands.
- Players must explode out with the dribble. Don’t allow them to go half-speed.
- Switch up which kind of pivot the players use. It can be forward or reverse, and with their left or right foot.
More Footwork Links:
Basketball Defensive Drills
19. Defensive Mirrors
Overview:
This is a fun drill for working on defensive footwork.
The drill requires players to mimic their partner’s movements which is great for developing reactions while working on defensive footwork.
The only problem with this drill is that only two people can go at once so if you have a large group it might not be appropriate.
Setup:
Everyone starts by finding a partner and standing in pairs behind the baseline.
If you have another coach, it’s best to use both ends of the court.
For this example, we’ll use the parallel lines of the key, but if you have two other parallel lines on your home court, you can use them too.
How it Works:
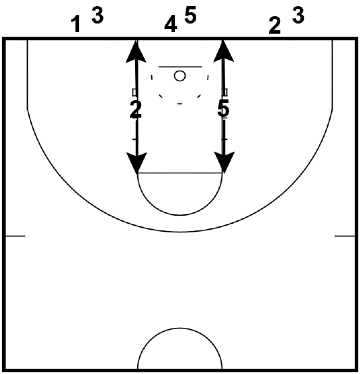
The first pair comes out and sets themselves up directly opposite each other on the two parallel lines of the key.
The coach then assigns one of them the offensive player and the drill begins immediately.
The goal of the defensive player is to stay directly in line with the offensive player. The offensive player must work hard to try and separate themselves from being in line with the defender by sliding up and down the line of the key.
After 15 seconds, the coach calls out ‘switch’ and the two players swap roles.
After 30 seconds they step behind the baseline and two new players come in.
Coaching Points:
- Players must stay in a low defensive stance with their hands out wide the entire time of the drill.
- Encourage the offensive player to use head fakes and quick changes of pace to throw the defender off.
- Make sure you cover what good defensive stance is before running this drill.
20. Defensive Specialist
Overview:
Defensive Specialist is a continuous drill that works on the different defensive movements players will make on defense including closeouts, defensive sliding, back-pedalling, and sprinting.
Setup:
Since it’s hard to explain where the cones and movements are by writing, I encourage you to take a look at the image associated with this drill for better comprehension.
You will require four D-men or cones for this drill.
All players begin in a straight line on the baseline.
How it Works:
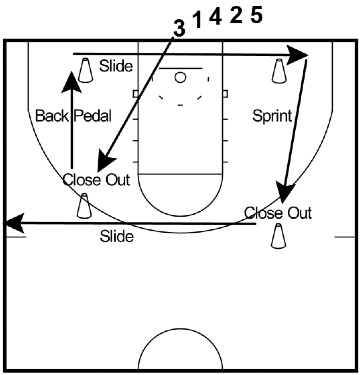
All players line up in a straight line on the baseline. Players perform this defensive course one-by-one.
The first movement is a sprint and then close out to the cone in front. The player then back-pedals around a cone directly behind them, and then slides across to the other side of the court.
When the first defender slides past the line, that triggers the next player in line to start the drill.
When the first defender has slid around the cone on the other side of the court, they again sprint to close out, and then once again slide to the opposite side of the court before returning to the end of the line.
Depending on the amount of players you have, run this drill for 3 – 5 minutes.
Coaching Points:
- Players must be sprinting and sliding at 100% effort throughout the entire drill.
- Hold the close out for a second or two before moving on.
- Make sure all defensive footwork is done well since this is a very important part of the drill.
21. One-on-One
Overview:
I love using one-on-one basketball drills at practice to teach both defense and offense.
By playing one-on-one, we’re forcing the on-ball defender to have to ‘guard their yard’. There’s no help defense coming. They’re on their own and must stay in front and challenge the shot.
Setup:
This drill starts with two players at the free-throw line or top of the key depending on age and experience.
The defensive player starts with the basketball.
The other players wait behind them near half-way.
Use both ends of the basketball court if you have two coaches so that players get to play more often.
How it Works:
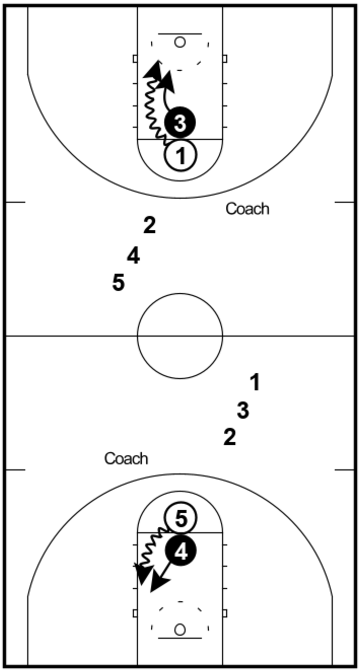
To start the drill, the defender hands the basketball to the offensive player. By handing the basketball to the offensive player, it ensures that the defender is challenging themselves by starting up close to the offensive player instead of standing back playing lazy defense.
The offensive player then has a maximum of 2 or 3 dribbles to attack the ring and get a clear shot.
Offensively, this drill teaches players not to waste their dribble and teaches them how to attack a defender one on one.
Defensively, players will learn how to keep an offensive player in front of them and challenge every shot.
After either a make or a miss, a new offensive player comes in, the previous offensive player switches to defense, and the previous defender joins the end of the line.
Coaching Points:
- Make sure you enforce the rule of 2 or 3 dribbles maximum depending on which you decide. We don’t want to allow the offensive player to waste dribbles and time.
- Encourage the defensive player to get up close and play hard defense. It doesn’t matter if they get beat a couple of times while they’re working on defending.
- Make sure players are using good footwork and good fakes.
22. Zig-Zag Slides
Overview:
Zig-zag slides are a great drill for a beginning team.
The two most important things this drill teaches is how to defensive slide properly and also how to drop step when playing defense.
Setup:
The drill begins with all players on the baseline lining up on one of the corners. No player should have a basketball.
No player should have a basketball.
How it Works:
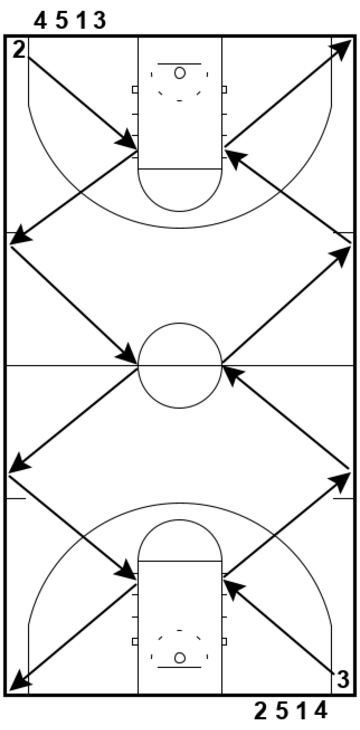
The first player will defensive slide from the corner to the high post and perform a 90-degree drop step so that they are now sliding back to the opposite sideline.
This process of sliding from one side to the other and drop stepping continues until the player reaches the opposite baseline.
They come back down the opposite side of the court using the same principles.
Coaching Points:
- Teach all players how to defensive slide and drop step at the beginning of the drill.
- Make sure players are in a low stance and don’t have their legs straight.
- Players should never cross their feet!
More Defensive Links:
Basketball Drills for Fun
23. War
Overview:
War is a great drill to incorporate fun small-sided games into your practices. It’s a series of small-sided games between two teams that can be played in both the full court and half-court.
This is always one of the most favorite drills no matter what level I’m coaching.
Setup:
The drill is set up by splitting your group into two teams and lining each half up along opposite sidelines.
For example, let’s say there are 12 players total and 6 players on each team. You will give the each individual player on each team a number from 1 – 6.
The drill requires one basketball and it always starts with the coach.
How it Works:
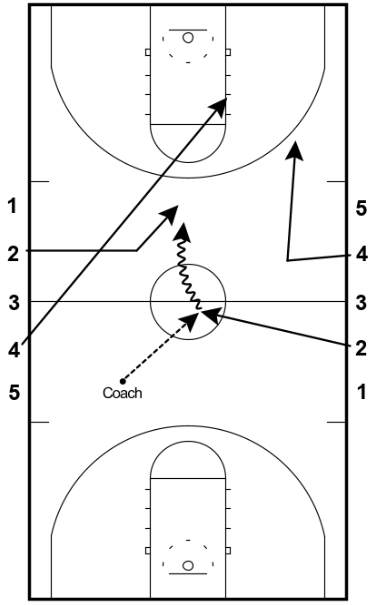
The drill begins with the coach throwing a basketball out into the middle of the court and calling out a few numbers between 1 and 6.
If the coach wants to play games of 3 on 3, they might call out “1, 4, and 5!” If this happens, numbers 1, 4, and 5 from both teams come out and play a game of 3 on 3 until a score occurs.
The coach can play games with any number of players from 1 on 1 to 6 on 6.
Coaching Points:
- Try to match the best players up against each other.
- Throw the basketball out to the advantage of one side each time because you don’t want players running into each other as they scramble for the basketball.
- Finish off the drill by calling everyone in!
24. Golden Child
Overview:
Golden child is another fun game that kids will end up begging you to let them play each practice.
It involves splitting up into two teams, a shooting team and a dribbling team, and then the dribbling teams must run around the half-court one-by-one while the shooters try and get them out.
Setup:
The first step is to split your group up into two similarly even teams.
The dribbling team must all have a basketball and they should be lining up at one of the corners of the baseline.
The shooting team will have one or two basketballs and will be lined up around the free-throw line or closer depending on age and skill.
How it Works:
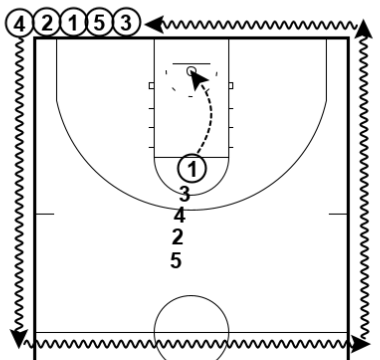
The drill begins with the coach calling out ‘go!’ which triggers both teams to start.
For the dribblers, the goal of the game is to make as many home run’s as they can. A home run is when a dribbler makes it all the way around the outside of the half court and back to the line.
The shooters must attempt to get them out by making a shot. If a shot is made the shooters must call out ‘STOP’ and the current dribbler must freeze. The next dribbler can begin immediately when this happens.
If they make it home, they get one run and can join the end of the line to run again.
This continues until all the dribbling players are out and then the teams switch roles. The team with the most amount of runs at the end of the game wins.
Coaching Points:
- The shooting team players must rebound their own shot and pass it back to the next person in line.
- If your players are struggling to make shots, consider splitting the shooting team in two and putting them on both elbows or even closer so that they have more chance of scoring.
- The coach must pick the golden child or there will be upset kids!
25. Elimination
Overview:
Elimination is a game I often run to conclude practice.
The goal of the game is to make your shot before the person behind you makes their shot. The first shot must always be from the free throw line but after that can be from anywhere on the floor.
Setup:
All players line up in a straight line behind the free throw line.
The first two players in line have a basketball.
How it Works:
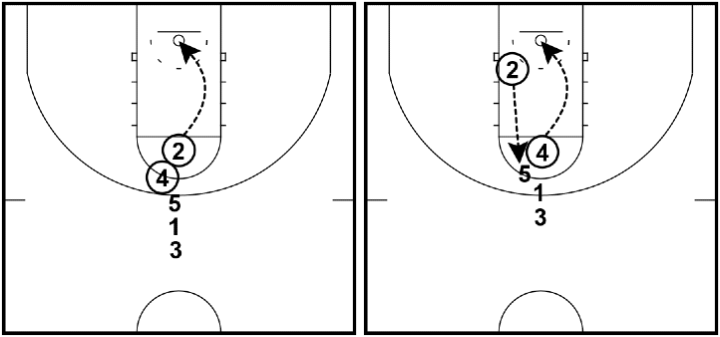
The drill begins with the first person in line taking a shot. If they make it, they quickly rebound their ball and throw it to the next person in line. If they miss, they must rebound the ball and score as quick as possible.
As soon as the first player has shot, the second player can begin.
If the player behind scores before the player in front, the player in front is out.
The drill continues until there is one person left and they are crowned the winner.
Coaching Points:
- The person in front must always shoot the basketball first.
- Players can’t intentionally miss the free throw shot off the backboard and lay the basketball in.
- Don’t be afraid to join in!
26. Small-Sided Games
Overview:
Do kids love anything more than playing a real game of basketball?
I recommend playing small-sided games for the benefits listed here. Depending on the amount of players you have, I believe 3 on 3 or 4 on 4 are the best small-sided games to use.
Setup:
Use both halves of the court and create small-sided games depending on the amount of players you have.
Tell each team they must advance the ball to either half-court or the third line of the court if you have one.
Each game needs one basketball.
How it Works:
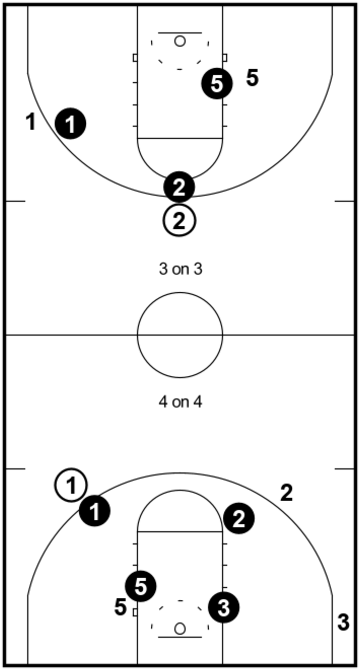
Start the game and let them play!
Make adjustments and team changes when you need to, but I recommend trying not to interrupt too much. Let the players learn from their own mistakes by experience.
Coaching Points:
- Small-sided games are the best. Click here to find out why.
- Stop the game if you see a mistake 3 times in a row. Until them let the kids experiment and learn on their own as much as possible.
- Stress the importance of spacing.
27. Game-Winner
Overview:
This drill is an awesome way to finish practice on a high note. Each time I run this drill, the players end up leaving practice with a smile on their face.
All it is is one long-distance shot where, if made, the shooter wins some kind of prize or award.
Setup:
Depending on the age of your team, select a distance away from the basket that is outside of their comfortable shooting range, but close enough that the kids can still throw/shoot the basketball and there’s a chance it will go in.
All you need is one basketball for this drill.
How it Works:
For this example, we’ll say that distance is the half-way line. Get all the players in one line at half-way and they each take a single shot.
The players that make the shot get a reward from the coach. This could be anything from a small prize to being the leader of warm-ups the following week.
Coaching Points:
- This is meant to be a fun drill to finish off practice. Make sure you and your players are having a good time!
- Make sure there’s a safe area under the ring so that no one will accidentally get hit by a missed shot attempt.
- The coach should take a shot too!
More Fun Basketball Links:
Take all 27 Basketball Drills to Your Practice
I created a PDF version of this blog post so that you could print off all the drills and take them to practice.
That way you’ll always have access to them even if you don’t have the internet.
(I even included an extra 4 drills in the PDF)
Click the link below and enter your email to get access to the PDF.
